Contents
Magnification
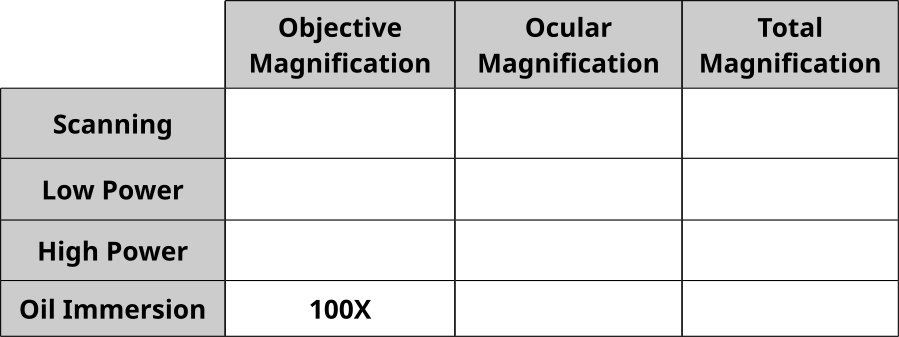
Magnification is the process of enlarging the appearance of an object. We calculate the magnification of an object by indicating the fold change in size. So if something appears to be double the size of the real item, then it is obviously magnified 2X. Because there is a magnification by the eye-piece (ocular lens), as well as the objective lenses, our final magnification of an item is the product of those two lenses.
The lowest magnification objective lens (usually 4X or 5X) is referred to as a scanning lens. There is also usually a low power lens at 10X and a higher magnification lens at 40X. There may be a higher magnification lens at 100X but these usually require oil to function properly and are often reserved for microbiology labs.
Exercise
- What is the power of the ocular lens?
- We can calculate that as:
Magnificationtotal = Magnificationobjective X Magnificationocular - With this in mind, fill in the following table:
Field of View (FOV)
In a microscope, we ordinarily observe things within a circular space (or field) as defined by the lenses. We refer to this observable area as the field of view (FOV). Understanding the size of the FOV is important because actual sizes of object can be calculated using the Magnification of the lenses.
FOV can be described as the area of a circle:

Area = π r2
What are the effects of magnification on FOV?

1) Lowest Magnification

2) Low Magnification

3) High Magnification

4) Highest Magnification
In image 1, we can see a model of DNA on a table with a water bottle and a large area of the room. Image 2 displays less of the room in the background but the DNA model is larger in appearance because the magnification is greater. In image 3, we no longer see evidence of a door and the DNA model is much larger than before. In image 4, we no longer see the table the model and water bottle rest upon. While the last image is largest, we see less of the surrounding objects. We have higher magnification at the cost of field of view. FOV is inversely related to the magnification level.
Field of View Calculation
- Examine a ruler under scanning magnification
- Measure the diameter in mm
- diameter= _________________
- radius= ____________________
- Calculate the field of view at this magnification= __________________
- Examine a ruler under low magnification (10x)
- Measure the diameter in mm
- diameter= _________________
- radius= ____________________
- Calculate the field of view at this magnification= ____________________
- What is the relationship in the between the magnification and field of view?
- What is the proportion of change in field of view when doubling the magnification?
The Letter “e”
- Orient a slide with the Letter “e” so that it is read as an “e” without magnification.complete this picture of the slide of the letter “e” with the label on the left side of the slide.
- Draw the “e” at scanning, low and high magnification

- Is the image under the microscope different from what you expected to see?
- Explain how the microscope terms you learned apply to each one of the images?
- Field of vision:
- Inversion:
- Magnification:
- Par focal:
- Resolution:
- Working distance:
- Field of vision:
Depth of field
- Examine the slide of colored threads under scanning power so the cross-point of the threads is at the center of the field
- Raise the magnification to the low power objective
- What do we notice about the threads and the focus?
- How can we explain this observation with respect to the threads?
- Close the diaphragm so allow a pinpoint of light through the slide. What effect does this have on the image?
We notice that when we observe 3 overlapping threads of different color under a microscope, we can focus on one thread at a time. Similarly, when we zoom in a great deal on the DNA model below, we notice that the print on the water bottle is not sharp.
Highest Magnification with shallow depth of field. Notice how the label on the water bottle is blurry while the lettering on the DNA model is sharp.
We know that the water bottle is behind the DNA molecule. Under the microscope, the threads of differing color are also stacked on top of each other. We recognize that they are in different planes because they are three dimensional. Each thread has depth and do not occupy the same exact space. If we focus on the print of the water bottle on the image above, we would no longer see the lettering on the DNA molecule sharply. We refer to this concept as Depth of Field (DOF). Under the microscope, at a low magnification, we can make out fewer finer details. However, most items appear on the same plane in this case and or comparably sharp. But as we increase the magnification and see finer details, the distances between the various planes in view become more apparent. We can see a similar phenomenon at low magnification of the DNA model. At the low magnification, we may not be able to read the print on the water bottle, but the bottle and DNA molecule are of a similar distance from our view that the small difference in apparent depth is not as noticeable. We can still draw on other visual cues to know that the bottle is behind the model, but the sharpness of both items are equivalent.
Examining Cells
In this part of the lab we will be looking at prepared slides and living cells on wet mounts that you will prepare.
Slide – Wet Mount:
A slide on which you add an isotonic medium (a solution with the same concentration of solutes as that found inside the cell) to the slide with the living cells is called a wet mount. Any living cells without cell walls that you place in pure (distilled) water will burst. You may make wet mounts of the following live specimens: Elodea, potato, onion, human cheek cells, Amoeba, Paramecium, Euglena.
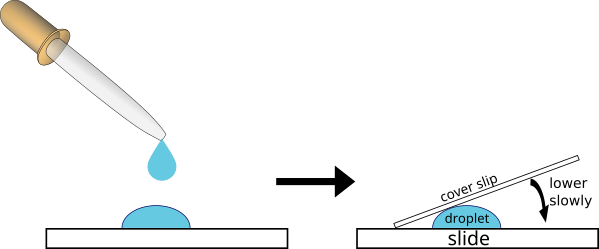
How to make a wet mount
Add a drop or two of liquid to a slide.
With the coverslip at a 30° to 45° angle to the slide, place one edge of the coverslip at the side of the droplet of liquid sitting on the slide. Gently drop the coverslip so that the other edge rests on top of the slide. This technique will minimize the number of air bubbles under the coverslip.
- Choose a prepared slide of a Protist (Euglena, Amoeba, Paramecium)
- Prepare a wet mount of a drop of pond water and place a cover slip over the drop.
- Swab the inside of your cheek
- Roll the swab across a slide
- Drop some methylene blue onto the slide
- place a coverslip over the drop
- visualize and draw your cheek cells
- Document your observations by drawing the cells and by using your phone to snap an image.

This entry is licensed under a Creative Commons Attribution-NonCommercial 4.0 International license.